My kids usually come through our side door and take their shoes off. When reading The House That Cleans Itself, I was inspired to find a real life solution for dealing with the kids’ shoes. I had tried a narrow shoe organizer in this space (it’s a very small area) and it didn’t work. The shoes weren’t put away and the organizer took up too much precious space. This inexpensive solution of hanging a shoe organizer on the wall, while not working completely (the kids don’t put their shoes in it when they walk in), does make picking up shoes a very quick affair without sacrificing space. I installed the key hanging/cork board long ago and it helps keep the keys in one place. Unless my husband takes my keys and leaves them on the curio. Or in his jacket. Or his pants. Or if I forget and leave them clipped to my purse. Anyway, you get the idea.
My Simplify101 class inspired me to consider what to do with kids’ papers. While I don’t have nearly the paperwork that families with kids in traditional schools have, I do have papers. In fact, I was ready to tear my hair out when my second son kept complaining that I hadn’t given him his memory verses from church. I HAD given them to him, twice in fact, but he kept misplacing them. The problem is that while each child has a school box for books in the basement, they don’t have a good place for papers. Furthermore, I had no place to put important papers that needed to go out the door with family members. I would often leave registration forms for my husband to take with him on the kitchen counter, hoping they wouldn’t be moved in the meantime. Invariably I would get a phone call, “Where is the ____ form?”
I know. The wallpaper desperately needs updating, but that’s a project for another day. The solution to my problem was to buy a magazine rack from Amazon. I got out my trusty label maker and made a slot for everyone, including a combined one for mom and dad. While I am not so foolish as to think anyone will put important papers in their slot on the way in, I do think it can remind them to take them on the way out. Right now, the kids’ reading club records for church are in their slots and my son’s registration forms for an upcoming mission trip are there, too. When I find these important papers, I know right where to put them and if I’m gone, I am betting the kids will figure out where to look. These magazine racks come in all different sizes and configurations. Would one of them work for you?
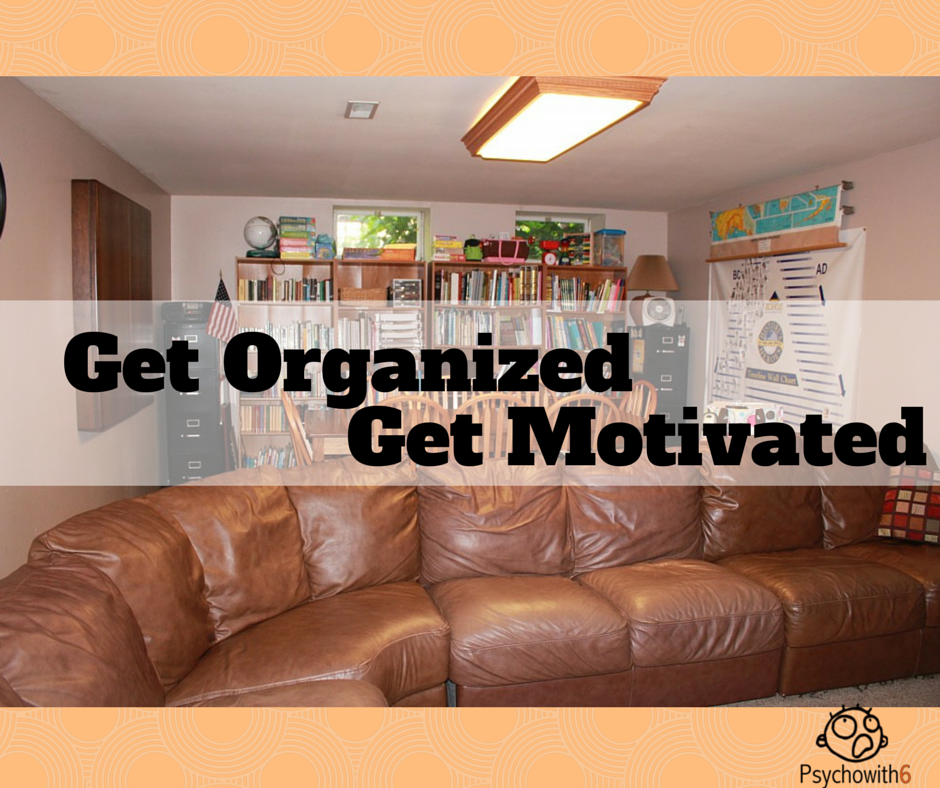
I have often made the mistake of thinking that organization was everything. It isn’t! While getting organized won’t make you a great homeschooler, it can help.
I used to hate my homeschooling space. It was cluttered, chaotic, and downright ugly. If you have many or young children, you will have to accept a certain amount of chaos. But if your space feels orderly, you and your students will, too. This summer, think about some inexpensive solutions to make a motivating space.
Get rid of anything you know you aren’t going to use. Give it away, sell it, or trash it if it’s something no one would want. I sold a curriculum book for $2 at a used sale that a woman told me she’d prayed she would be able to get inexpensively. That made purging and selling worth it to me!
Make everything that you will be using in the upcoming year visible. I know I am not the only homeschooler who forgets she owns something and buys it again! All of my bookshelves are cheap office store purchases. They’re not good quality, but they do the job. If you need more books visible to you, consider buying more bookshelves. Craigslist is a great place to look!
Put everything you will not be using this year out of sight. The fewer distractions you have, the better. I keep unused materials in storage on even less sturdy shelves organized by science, history, and other.
Separate individual kids’ materials. I use inexpensive plastic crates for this purpose that I store on bookshelves.
Create a space to store individual work for the year. I use additional plastic crates to hold files for each school year for each child. Besides being a place to record what we do to adhere to the law, it’s a great place to store memorabilia.
Create a record keeping system. I’ve tried just about everything and found that a paper system works the best for me. This year, I am combining my love for scrapbooking and junk journals with my homeschool record keeping. I created an album using Ditto products.
Create a homeschool toolkit. Homeschool teachers don’t have a desk where everything they need to do their job is at the ready. That’s why a mobile toolkit comes in really handy. Find a cute bag to organize all of your essentials. I was inspired by this blog post to create this toolkit:
Inside is my record-keeping journal (this picture was taken before I was done with it), files to hold work completed by each student in the coming year), pens, sticky flags, my label maker, flash cards, and more. The kids’ files from previous years are stored under the sofa table we bought from Craigslist.
Decorate your space. I recently overheard two school teachers talking excitedly about getting into their classrooms and getting it ready for the school year. Classroom decoration has to be functional, but it doesn’t have to be ugly. My favorite parts of my school space are my pull-down maps I purchased from ebay and the white board/cork board I bought from Craigslist.
Functional, but all the mess is INSIDE.
We purchased our table and chairs from Craigslist also, but the paint and removal of scattered posters and papers from the walls made the biggest difference. Could you put information for your students on a display board that can be put away? Or could you frame them using art or poster frames?
Pray and ask for wisdom. We know that God will always give us wisdom! Before I made over our school space, I prayed about it. When I was in the middle of the chaos, I honestly didn’t know what to do. But God answered my prayer and gave me a space that motivates me and the kids, too. May He do likewise for you.
Have I ever mentioned that I homeschool six kids? As a result, I have stuff. A lot of stuff. Not only do we have a lot of toys and games (multiply just six gifts a year times six and you’ll see my problem. Of course, they get more than six gifts each!).
I have spent years coming up with systems for keeping toys, games, and puzzles organized. I have definitely found some approaches that work. For example, storing games vertically works better than horizontally or in bins. What also works is using our old ping pong table to provide storage for suitcases and bins underneath. What isn’t working is the putting away part.
Not only do I have six kids full-time, but I have had 11 more joining us for homeschool activities on Fridays. Our super fun co-op activities require lots and lots of art supplies. Using them is fun. Putting them away isn’t.
As you can see, I’ve tried clever strategies for storing paints and underneath the bench are more art supplies.
Yet another problem with our storage area is that it isn’t just for kids. We keep our gifts, gift wrapping supplies, electronic accessories, party supplies, and seasonal decorations here, too.
In our playroom is a second closet we use for costume storage. This is another area where I need A LOT because of our co-op activities. This year we had to dress for the Revolutionary War and for Africa.
I was determined to get control of these areas while participating in my simplify101 class and to be ready for next school year. The good news is I no longer have toddlers or preschoolers. In theory, the kids should be of help. 🙂 I did enlist everyone’s help in decluttering. The approach that works best for me is to lay out a blanket on the playroom floor. Any of the kids may take items that they wish to donate to the blanket. Anything not worthy of donating goes directly to trash bags. This system works beautifully because everyone can see what is ostensibly being donated. Otherwise the older child gleefully puts all the younger’s favorite toys out for donation. Likewise any educational items would go bye-bye without my watchful eye. My husband played a crucial role in boxing up all the donated items and drove them to the charity the same day.
I haven’t shown you every part of the storage room (there are other shelves that were organized and hidden bins that were emptied), but these are the results!
The red bucket on the right is my solution for keeping this room organized. Anything that needs to be put away goes in the bucket, NOT on the table. When it’s full, it will be emptied.
My other idea was to put plastic tablecloths I already owned on the ping pong table. The paint is chipping off of it anyway and it creates a don’t-mess-me-up atmosphere that partners well with the red tub.
The biggest job with the craft and seasonal storage areas was to throw things out.
I was able to get rid of enough stuff that I could keep a bin of other costume basics that was being stored with the toys and games. As you can see, I am continuing to store outsized shoes here.
Hope I’ve inspired you to unload toys, crafts, or costumes that you don’t use, need, or love!
A year ago, my oldest son started asking for his own room. Well, with five other siblings requiring bedrooms, that wasn’t possible. But I did think it was possible to give him his own office.
We built this large closet for toys in our basement eleven years ago. Originally it had wire shelving, but the shelves kept tearing out of the wall. They weren’t designed to store all the toy bins we stacked on them. The other problem was my inability to lock these doors to keep every tiny toy from being flung around the room without supervision.
My second attempt at taming my toy closet was to remove all the toys and shelving. Toys were moved to an unfinished storage room that could be locked. I purchased four tables inexpensively from Office Depot and stored linens, ski clothes, jujitsu clothes, and hand-me-downs in the closet. This arrangement worked better than the previous system. The only thing that was taken out consistently was blankets for the kids’ fort building.
It seemed like the perfect room for my son’s office. I moved some of the items stored there, put his computer, a lamp, and bulletin board in it and expected him to be happy. He wasn’t. The kids and my husband were constantly in his office getting blankets and jackets and leaving toys. (I will leave it to you to figure out who was getting what). My son told me he didn’t have enough room to work. Buying him a nice chair didn’t solve the problem. Eventually it became a dumping ground for his stuff.
The Simplify101 class motivated me to try again. I got rid of a van full of stuff from my large storage area and the kids’ rooms (with their help). I will show you the results of those projects soon! I also cleaned out a nearby closet. These decluttering sessions gave me the room I needed to store everything that didn’t belong in an office. I removed two of the tables, which will be great to have accessible for entertaining and our homeschool co-op.
In my large storage area, I found some wall words we inherited from my late father-in-law when he sold his condo. The phrase was appropriate for my son’s love of education and future aspirations: Learn from yesterday, live for today, hope for tomorrow. I put it up, set up his printer, and cleaned. The room looked great, but the ceiling tile was damaged from a long ago toilet overflow. The plastic pieces that once held wire shelving were also still in place.
Still mindful that this is organizing WITH kids, my husband taught my son how to putty, sand, and paint over the holes left by the hardware. He also replaced a ceiling tile. Unfortunately, the paint my husband thought was from the basement wasn’t. It IS, however, a basement office where perfection isn’t required. The final piece was a painting from HomeGoods that my son loved. He is enamored with city life. Apparently he has good taste because a woman at the HG checkout was very disappointed I was taking the only painting like it from the store!
He tells me he LOVES his office now. I took this picture of him and realized that the orange cube, although something I had on hand, was a no-go. What a great way to be objective about your space: take pictures! I replaced it with another plastic book shelf from Office Depot and everyone is happy that my teen has his own room at last.
Summer is organizing time for me. Homeschooling six kids means LOTS to organize. This summer I signed up for Simplify101’s Organizing with Kids online class. I have absolutely loved the ideas and the inspiration. I thought I would share my projects with you.
The first project I’m going to share is the last room I want to go into: the kids’ upstairs bath. I have FIVE boys and ONE girl using one bathroom. Need I explain more? Aby’s class really helped me evaluate the problems I was having with this room.
You see two of the problems in the above photo: the kids leave towels and swimsuits on the floor. In the past I might have just thought about how MISBEHAVED the kids were and gotten nowhere. The truth is they didn’t have a good place to hang wet swimsuits and towels. One or two people can store these things on the shower railing, but six CANNOT. An additional problem I had with the towels was knowing whose was whose. While I had long ago bought each child a specific color towel, the kids managed to mess up that system by arguing that their color was the turquoise blue and not the deep blue. They had also begun ignoring the color system completely. Most of the towels were very worn, so I was ready to make a change.
I decided I wanted to get the kids personalized towels to solve the problem. I also wanted each child to have a place to hang wet swimsuits. This is what I came up with:
I can’t even explain how giddy I am over this. I ordered the towels from PotteryBarn Teen. I was set to get even cuter towels from PotteryBarn kids, but I wanted bigger towels, especially now that I have TWO teens in the house. These towels are so luxurious! The hooks I bought from Home Depot. A smaller hook holds the kids’ swimsuits underneath the towel. The kids do leave their clothes in the bathroom after showering, too, but I do not want a clothes hamper in here holding a mix of things. Instead, I will be checking the bathroom daily and making the offenders return their dirty clothing to their respective hampers.
Problem #2 was a jumble of toiletries. I had attempted to solve the problem with labeled plastic drawers. These were ignored and no one had any idea whose toothbrush, toothpaste, and hair brush was whose. A collosal mess was made in the two drawers under the sink.
I figured the answer had to have something to do with the closet, whose space was being poorly used.
This was my answer. I bought mesh toiletry bags for each kid from Amazon for under $5 each. I also bought second towels in turquoise with the kids’ names embroidered in white to use alternate weeks.
I quickly grabbed scrapbooking supplies to label each kid’s bag. The kids did the rest using my LetraTag label maker. Not only are the bags labeled, but everything inside is, too.
One of the important aspects of this class is that the kids be involved. I was thrilled that my daughter wanted to clean the sink. I should have asked her to pay me to do it, Huckleberry Finn style. 🙂
Here’s the sink after. I have since purchased bathroom cups and a SpongeBob soap dispenser. I leave the dental rinse and cleaning wipes out so they will be used, even though it doesn’t look as neat.
So that’s my bathroom organizing project with the kids. I look forward to showing you the other projects soon!
I have a friend who will begin her homeschooling journey this fall. She has been asking some excellent questions like this one: how do you homeschool with toddlers and newborns? I homeschooled for nine years with toddlers and newborns and while I didn’t do a perfect job of it, I do have some things to share.
The first and most important way to homeschool with little ones is to reign in your expectations. In this regard, I had an advantage because I had never homeschooled WITHOUT toddlers and newborns in my home. If I had, I probably would have been tearing my hair out! As it was, it was all I knew. If you are picturing school at home rather than a home that is a school, you will end up frustrated. Babies and toddlers aren’t allowed at traditional schools. It’s impossible to create the same quiet, orderly atmosphere at home as a classroom teacher can when you have little ones. But that doesn’t mean your homeschool is inferior!
Recognize that there are advantages to having babies and toddlers in your homeschool. They aren’t an interruption in your school day; they are the reason you are teaching. Having older children experience young children is a part of their education. I taught a college developmental psychology course and had to ask the students to find a way to spend time with young children. The sad fact is that in our lower birthrate, age-segregated society, having a lot of experience with young children is rare. Younger siblings teach your older children to be gentle, patient, and less self-absorbed. The olders learn how to teach the youngers. The youngers learn from their siblings and listen in as you teach the olders.
Homeschool in the most baby-friendly area of your home. The last thing you need to worry about is the littles getting hurt while you’re explaining long division to junior. The room I used as our primary school room was attached to our playroom. I allowed the youngers to move from room to room as they chose. Lower shelves in our school room had toddler-friendly books and toys. Consider having a box of school time toys that are only available at set times.
Buy your toddlers the same workbooks as their siblings. David Hazell of My Father’s World does an excellent talk on the subject of occupying toddlers. One of his best suggestions has to do with the fact that we homeschoolers buy all kinds of new school goodies for our elementary kids every fall and nothing for the toddlers. David calls this “Christmas Without Me.” He recommends buying identical workbooks even if it costs you a little dough. The peace you get in return is well worth it!
Schedule projects that aren’t baby-friendly during nap time. I spent lots of time reading to my older kids while nursing babies. When it came time to do the timed science experiments, the baking, or the obstacle course races, I made sure the little guys were sleeping. Does that always work? Nope! Some days there is no nap. That’s when you reign in your expectations. Tomorrow is another day.
Schedule play dates with other homeschooling moms with young kids. You’ll discover you’re not alone and your friends will help you reign in those expectations. For several years, I participated in a Bible study with other moms while a teen watched our youngsters. A Mothers of Preschoolers group is another great way to connect with moms in the trenches.
Make sure you have “me” time. When I had lots of little ones, I had a housekeeper come in twice a month. I also had my niece watch the kids for me a couple of hours every week. Occasionally, I would use that respite time to go on dates with my husband. It helped me enormously! If you can’t afford these options, swap babysitting duties with a friend or clean together. I’ve used these approaches, too. Having some time away isn’t selfish; it helps you to be a better mom and wife.
Remember that this is a short season. Even though I had nine years’ worth of little ones in my homeschool, it flew by. Now I wonder why I had such a fit about all the books being pulled off the shelves, the toys scattered everywhere, and the lessons we didn’t finish. These are precious days. Enjoy learning together.
Do you have any other suggestions for homeschooling with babies and toddlers? Join the conversation at Homeschool Sanity on Facebook.
I’m a Christian psychologist turned homeschooling mother of six. My life can be a little crazy, so I look for sanity-saving ideas to use and share. I hope you’ll read my About page to learn more.