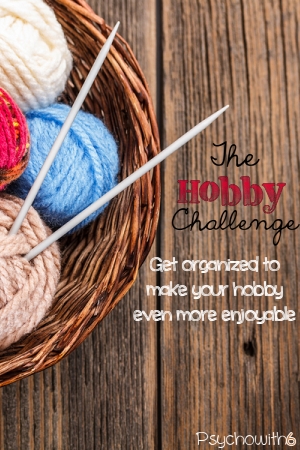
Last week, we organized our blog or business. This week we organize something that almost all homeschoolers have: a hobby. Whether you’re a crafter, a musician, or just a reader, this challenge is for you! If your hobby involves making gifts, this week is the perfect time to work on them as the holidays approach.
#1 Identify your priorities
If you didn’t read last week’s post or see the 1 Thing To-Do List I created, you may wish to read them so you can apply one-thing thinking to your hobbies. I’m a scrapbooker and it’s easy to become overwhelmed by all the photos and photo projects I’d like to complete. But I chose one thing to focus on and it’s my son’s school years scrapbook. I hoped to complete it by his graduation, but didn’t. Now my plan is to give him the book as a Christmas gift.
Choose one project or priority to focus on that would have the biggest impact. Hint: Christmas can be a great motivator!
#2 Declutter
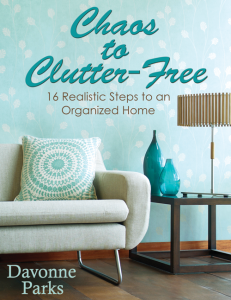
If you’re a hobbyist and you’re reading this series, chances are good that you’ve accumulated too much. The clutter leads to paralysis. Every pile of materials leads you to think of something else you could be doing. I just read the book Chaos to Clutter Free and loved it. It’s really motivated me! I think it will motivate you, too.
As a scrapbooker, I went through all my paper and got rid of everything I didn’t love. It was amazing how much I still had left, but decluttering made me more excited about my hobby. I also got to bless a scrapbooking friend with what I didn’t need.
For now, spend some time throwing or giving away materials that you aren’t using. These are some thoughts that help me release hobby materials:
By the time I am ready to use this, I will have other projects I’ll want to do.
By the time I am ready to use this, it will no longer be timely or usable.
If I decide later that I really want to use this, I can purchase it again.
#3 Organize
Once you’ve decluttered, organize your supplies in a way that makes sense for your specific hobby. Put like items together before purchasing organizing supplies.
I organized my scrapbooking supplies into page kits in an over-sized three-ring binder. That turned out to be perfect for my son’s school years album. I pulled out any page kits that I thought would work for the album and it made my scrapbooking so fast and enjoyable.
Consider organizing supplies by project, so you have everything you need for your top priority project accessible to you. Spend time looking for organizing ideas for your particular hobby. I will pin some ideas to the Organized Homeschool board on Pinterest.
#4 Time block
Once you have your supplies organized, you will want to make time to work on it. I have spoken to dozens of women who love to scrapbook like I do, but tell me that they haven’t done it in ages. The problem is that their hobby isn’t put on the schedule.
I wrote about how I make time for scrapbooking every week. I have the added benefit of accountability because I have a friend who loves to scrap and is disappointed if I don’t keep my appointment with her. I had to do more time blocking to work on my son’s album and my friend’s 12-hour crop was the perfect opportuntiy. I had to resist all the other options that vied for that time, but I’m glad I did. I’m still not done with the album, so will time block to make sure it’s completed by Christmas.
Put a time on the calendar when you will commit to working on your priority project and don’t let anything but emergencies interfere with that time.
I’d love to know what hobby you want to organize this week!
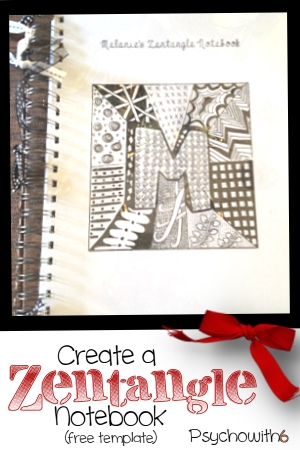
Last year I bought my daughter, Elaina, a Zentangle book and some pens for Christmas. I bought myself a book, too, and discovered that I was zentangling when it was called doodling.
It turns out that doodling is good for you and produces some pretty cool looking art, too.
The problem was, I didn’t have any place to put my zentangles. I Googled for notebook templates so I could make my own notebook using my Zutter binder, but couldn’t find any. You know what they say about necessity! Microsoft Word to the rescue. I downloaded and installed this script font and block font for the initial. I then created a cover and inside page template, copied them onto acid-free cardstock, added an acetate cover and bound the book with silver coils. The finishing touch was some black and white ribbon I had lying around.
My daughter saw me making my notebook and begged me to make one for her, which I promptly did. We zentangled the front covers of our notebooks in pencil first and then used acid-free black marker to go over the design. The inside pages allow you to add four zentangles each.
If you need a gift for a kid or someone who’s at all crafty (not artistic, because no art skills are required), you’ll love a zentangle notebook. It’s fun to make and would make a great accompaniment to a zentangle book and pen set. If you don’t want to create this yourself or if you don’t have a binder, you could have it put together at an office store.
You can download the cover for the zentangle notebook here and the inside page template here. You will have to download and install the fonts referenced above to edit the cover. If you like this, I hope you’ll share it on Pinterest and Facebook. If you do Project Life, you may enjoy this post where I share free weekly cards. I will be linking subscribers to this year’s cards soon!
Nine years ago I had the crazy idea that I could take my own family Christmas photo to send with our yearly Christmas card. My husband loved my first photo so much that he asked me to send them out as postcards to his customers–librarians. The response from friends, family, and librarians was so positive about not only the photo, but the short “letter” on the back of the postcards that the sending of the cards has become an annual event. People often tell me, “I can’t wait to see what your card will be this year!” It’s a lot of pressure, but honestly a lot of fun. I hope you get some creative inspiration you can use for taking your own family Christmas photos and will consider sending cards. I use Send Out Cards where I can have my postcards sent automatically to everyone on our list–a major time saver because we send over 300.
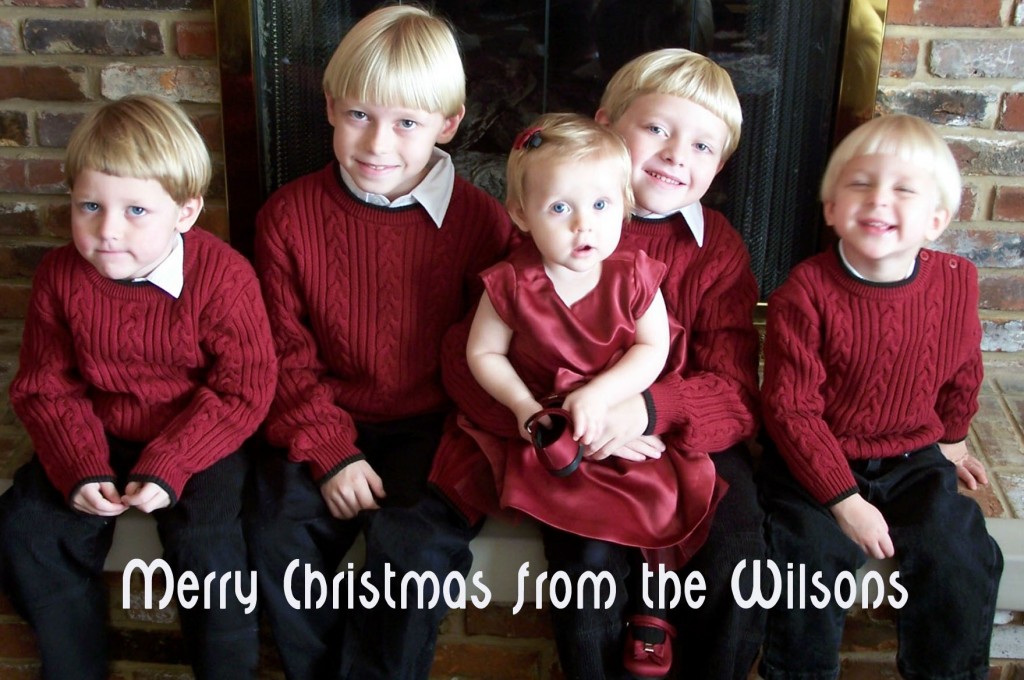
#1 The Imperfect Card
This was my first attempt at taking my own family Christmas photos for cards. People loved that my daughter is holding her shoe, that my little guy on the right is so happy and wiggly that he’s blurred, and that my Andy isn’t smiling on the left. On the back of the card, I listed the top ten comments we receive and our responses: 10. Are these all yours? (Yes, we collect them)9. They all look alike (We used a home cloning kit)8. What are their ages? (8, 6, 4, 2, and 11 months)7. You finally got your girl. (No, it’s another boy. We just put bows in his hair.)6. That girl doesn’t have a chance with all those brothers. (No chance to play alone!)5. You must have the patience of a saint. (We’re just tired. If that’s patience, ok.)4. Your kids are so well behaved. (Great! Can they come play at your house?)3. I don’t know how you do it. (We’re glad. You probably wouldn’t approve.)2. Are you done? (Would you believe us if we said yes?)1. You really have your hands full (Yes, and our hearts, too).
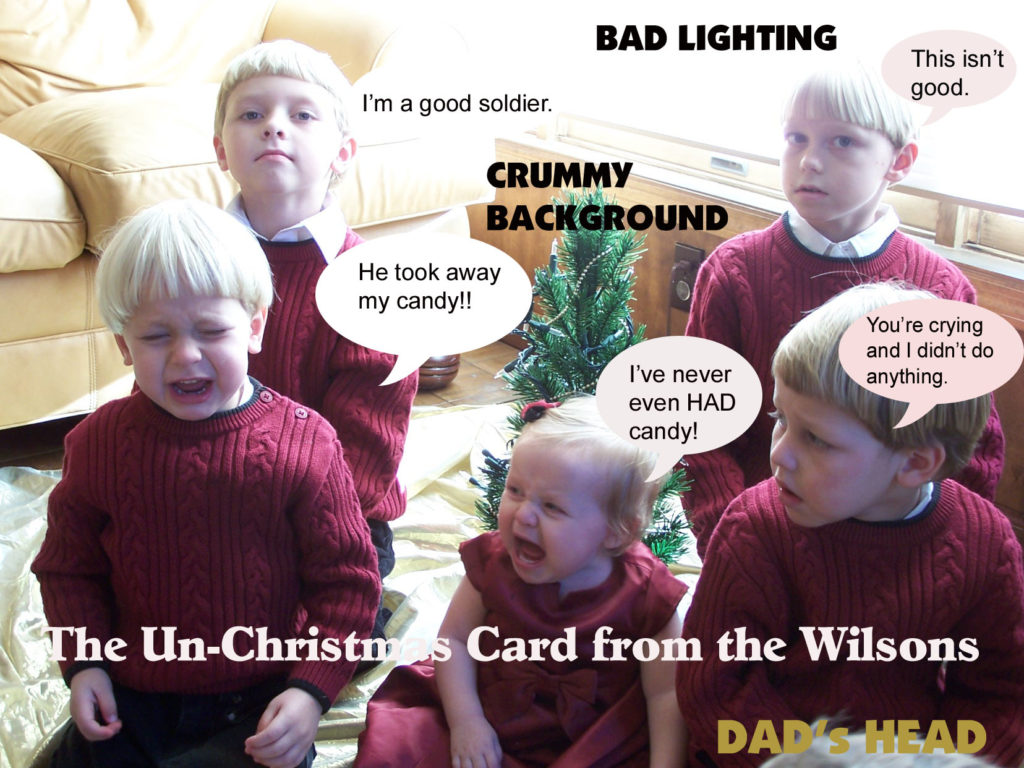
#2 The Un-Christmas Card
What they didn’t know is what I had to go through to get this level of photo imperfection. While I didn’t send it out, I had fun doctoring up one of the shots for an Un-Christmas Card below.
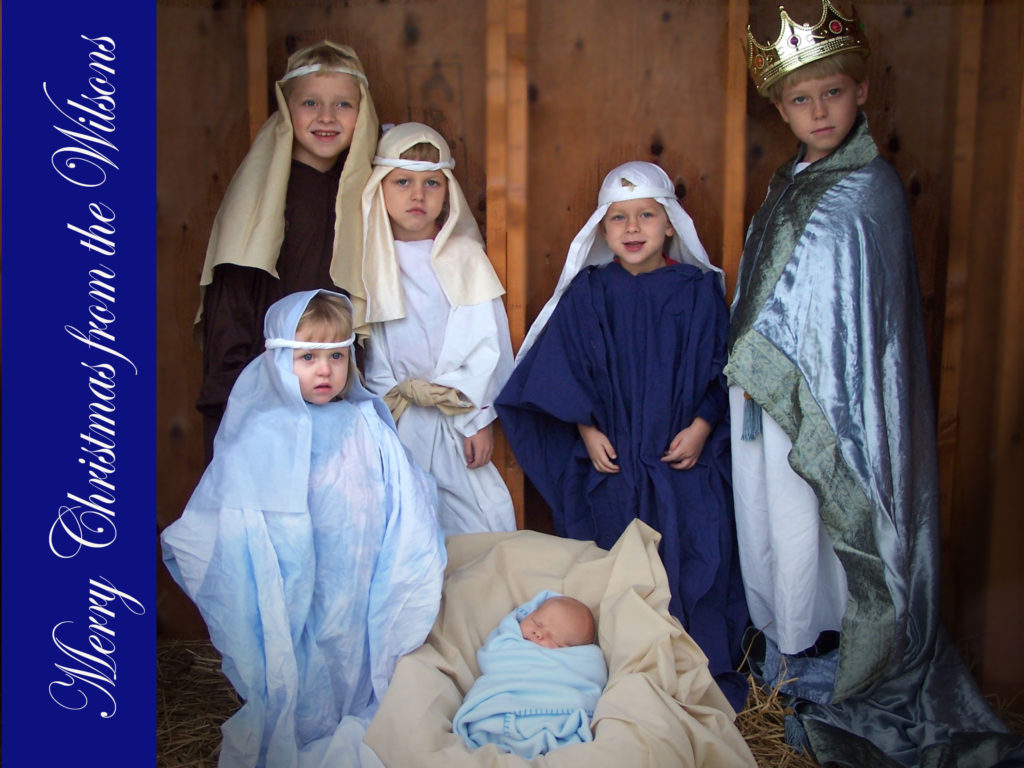
#3 The Nativity Card
By far the fan favorite, this photo was taken just 11 days after our youngest was born. A friend gave me the idea. We used the shelter that a nursing home hadn’t finished setting up for their Nativity scene yet. On the back of the card, I used cast notes to describe what was going on in each child’s life.
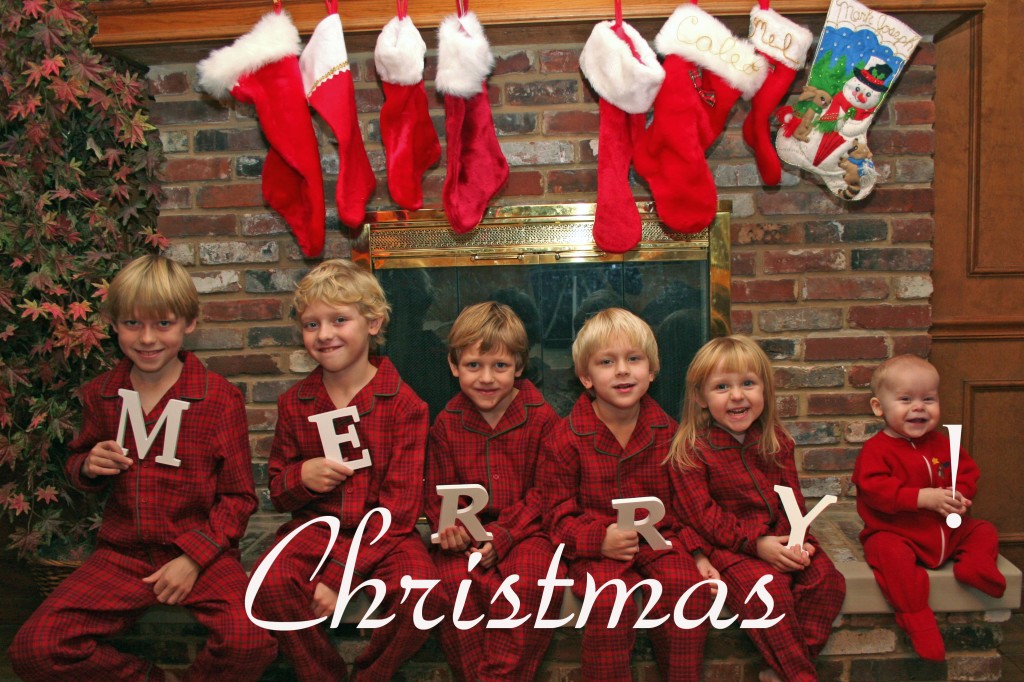
#4 The Spell it Out Card
I bought matching pajamas for everyone and had everyone but the baby holding a wooden letter. I used a photo editing program to add the exclamation point and the word, Christmas. On the back of the card, I used M E R R Y ! as an acronym to describe the family news of the year.
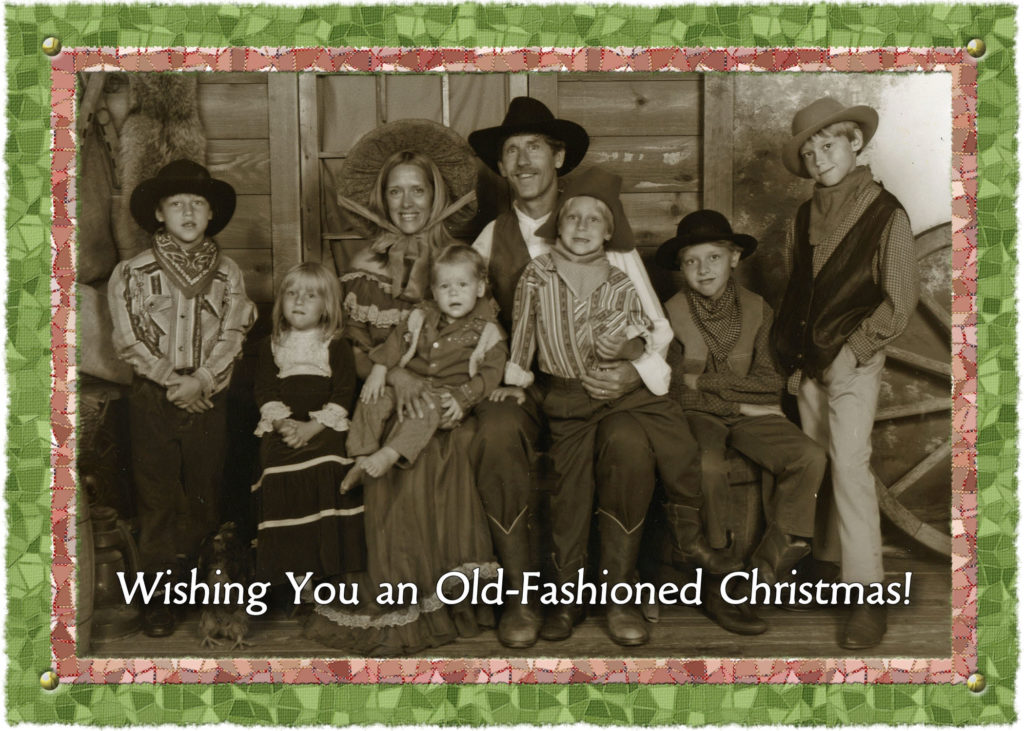
#5 The Old-Fashioned Christmas Card
We had this taken while we were on vacation one summer. What you don’t know is that the baby was coming unglued during this process because he hadn’t had a nap!
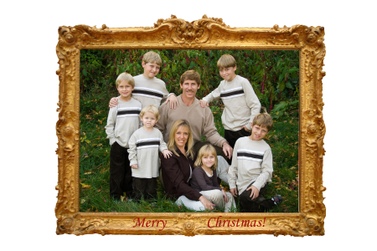
#6 Family Portrait Card
We had our family picture taken professionally by Cindy’s Photo. I put a gold frame around this picture for the card and noted what everyone’s “profession” was on the back.
#7 The Family Tree Card
I had everyone dress in green and we tried to make it work with real Christmas lights, but I ended up editing the photo digitally to make it work. I shared the new things we “branched into” in 2009.
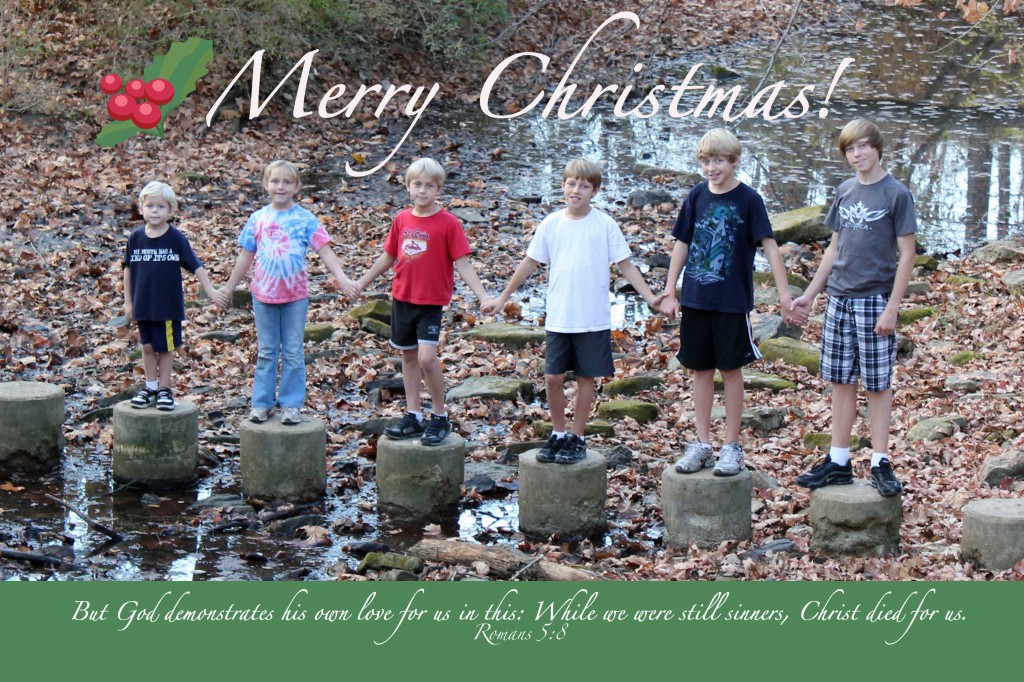
#8 The Real Life Card
This was a favorite of many. I took the picture on a fall hike without planning ahead at all. On the back of the card, I shared “real life” challenges we were having. The Scripture shares that while we were still sinners, Christ died for us.
#9 The Peace on Earth Card
I used red duct tape for each of the kids. The reflection from the flash was a bit of a problem, but it was a hit. I had people using the idea, which is just fine, because I got the idea from someone else! On the back of the card, I shared what each kid says all the time.
#10 The Brady Bunch Card
This was last year’s Christmas photo. I took everyone’s picture against a green backdrop. The family news on the back of the card was to be sung to the Brady Bunch tune.
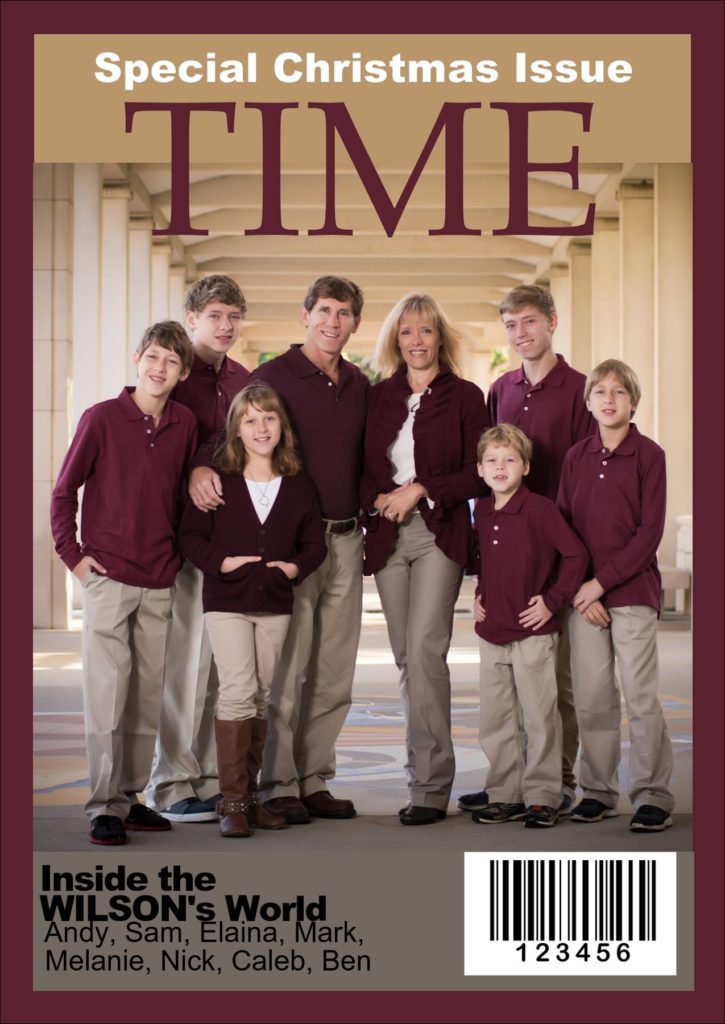
Bonus #11 The TIME Card
On the back of this card I wrote how each family member spent his/her time. The photo is also by Cindy’s Photo.
Want to see this year’s card? Like the page on Facebook and you will!
This month’s hot flashes are in a new format similar to what I do with What’s Hot in Homeschooling. If you’re new to this series, allow me to explain that I give a detailed account of my hot flashes from the previous month. Not the wake-up-drenched or the open-the-freezer-to-cool-off-quick kind, but the hot news, reviews, and ideas I just have to share.
#1 The Treasure Box Scrapbook Kit Review
I found The Treasure Box at a local scrapbooking convention and was blown away by the quality and the price. Everything you need to complete six pages (3 double-page spreads) is included but adhesive, ink/chalk, and tools. I’m delighted with the results which my husband has declared are the best pages I’ve ever done. The price? Just $20.99 a month which includes shipping. The website states this is the lowest price on the internet. Try spending just ten minutes a day on these kits and use a Cropperware Page In Progress Box to keep everything in place until you can work on it again.
#2 CollegePlus Prep Review
My oldest son did CollegePlus Prep when it was a year-long program that involved group coaching. He found the study skills and logic courses valuable. While he decided not to take the CLEP tests that are part of the program so he could take AP courses instead, we both were impressed with the godly leadership of his coach.
My second oldest son, Sam (15 and a sophomore) enrolled in CollegePlus Prep this fall. To say that he is different from his brother is an understatement! I wasn’t sure what he would think of it. But CollegePlus Prep was much different than it was when my oldest enrolled. Sam did the study skills and reasoning parts of the program, but jumped right into studying for his first CLEP. Previously, this waited until the spring. I could tell Sam was anxious about both the workload expected of him (about two hours a day) and how he would do on the exam.
This month Sam took his first CLEP tast and passed! We are so proud of him. But I really can’t say enough about CollegePlus Prep so far. It’s true that you can guide your child through the process of CLEP testing on your own and save some money. But the experience of the staff and the one-on-one attention Sam has received are well worth the expense for us. Sam’s coach not only encourages and assists Sam in studying the excellent materials provided, but has helped him set personal goals, and is helping him to grow in his faith. For example, Sam studied for and passed his driver’s permit exam with his coach’s encouragement and is asked to study Scripture around his life purpose.
Right now the plan is for Sam to begin working on his bachelor’s degree in earnest next fall. Meanwhile, my oldest is in the process of applying to college. I have friends who have asked me what their child should do where college is concerned. Because getting a four-year degree through CollegePlus is estimated to cost $17,000 right now, my advice is to use the Net Price Calculator to determine how much a college degree will cost your child elsewhere. By entering your family’s financial information, your child’s GPA, and actual or expected test scores, you can get a good estimate of what kinds of grants, automatic scholarships, work study, and loans your student would qualify for. These estimates do not include competitive scholarships.
#3 Yummy & Easy Lunch Idea
When I found this pin on Pinterest, I knew I had to try it. I have a friend’s family over for joint classes and lunch one day a week. I have to whip something up quickly for nine hungry kids (including four teen boys!) before we leave for P.E. classes. This fit the bill. I rolled up turkey pepperoni and half a part-skim mozzarella stick in a reduced fat crescent roll. I served these with marinara for those who wanted it. I heard several, “Make these again!”
#4 Cleaning Without Chemicals
I went to one of those home parties that I dreaded. I wanted to help a friend out more than anything. I know how awful it is to have no one show up!
Norwex is a company that sells naturally anti-bacterial and ultra microfiber cloths. I liked that idea, but it wasn’t until I actually used the products that I was hooked. I have the window cloth that cleans my windows, mirrors, and shiny appliances with only water. And they have never been cleaner! I also purchased the makeup removing cloths and couldn’t believe that with just water, they removed all my makeup–even the waterproof kind. No more eye irritation from the makeup towelettes I was using before! The dust mitt, enviro cloth, and cleaning paste keep my bathrooms cleaner than ever with no harsh chemicals. The kitchen cloth and towel can stay wet without smelling musty. I can have the kids clean my car interior with just water, too!
#5 Grow Your Blog with Pinterest
Last month was my biggest traffic month ever, doubling the page views of my previous high month. Why? Because I created a pin of 6 Crazy Easy Crock-Pot Recipes. This was a guest post on Stuff Parents Need. I fully expected the majority of traffic to come from the other blog or from her boards on Pinterest. Instead, the majority of my traffic came from my own Pinterest board which doesn’t even have the most followers! You can be sure that I will be doing more posts like these.
This month we had our family portrait done while my oldest was having his senior pictures taken. I absolutely treasure family portraits. If I only had time to grab a few photos in a fire, that’s what I’d grab. (Except I think our photographer has copies, too! But you know what I mean.) What makes me sad is whenever I mention family portraits, someone invariably tells me they need to do that. Please don’t wait! It doesn’t have to cost you anything. I have a homeschooling friend who’s a photographer and I bet you do, too.
If you’d like a peek at one of our family photos, I’m sharing a proof on the Psychowith6 Facebook page. While you’re there, I’d love for you to click “Like” so we can keep in touch.
I’ve been scrapbooking off and on since I was a girl. I really got into it when I had my first child and loved going to Creative Memories crops with friends.
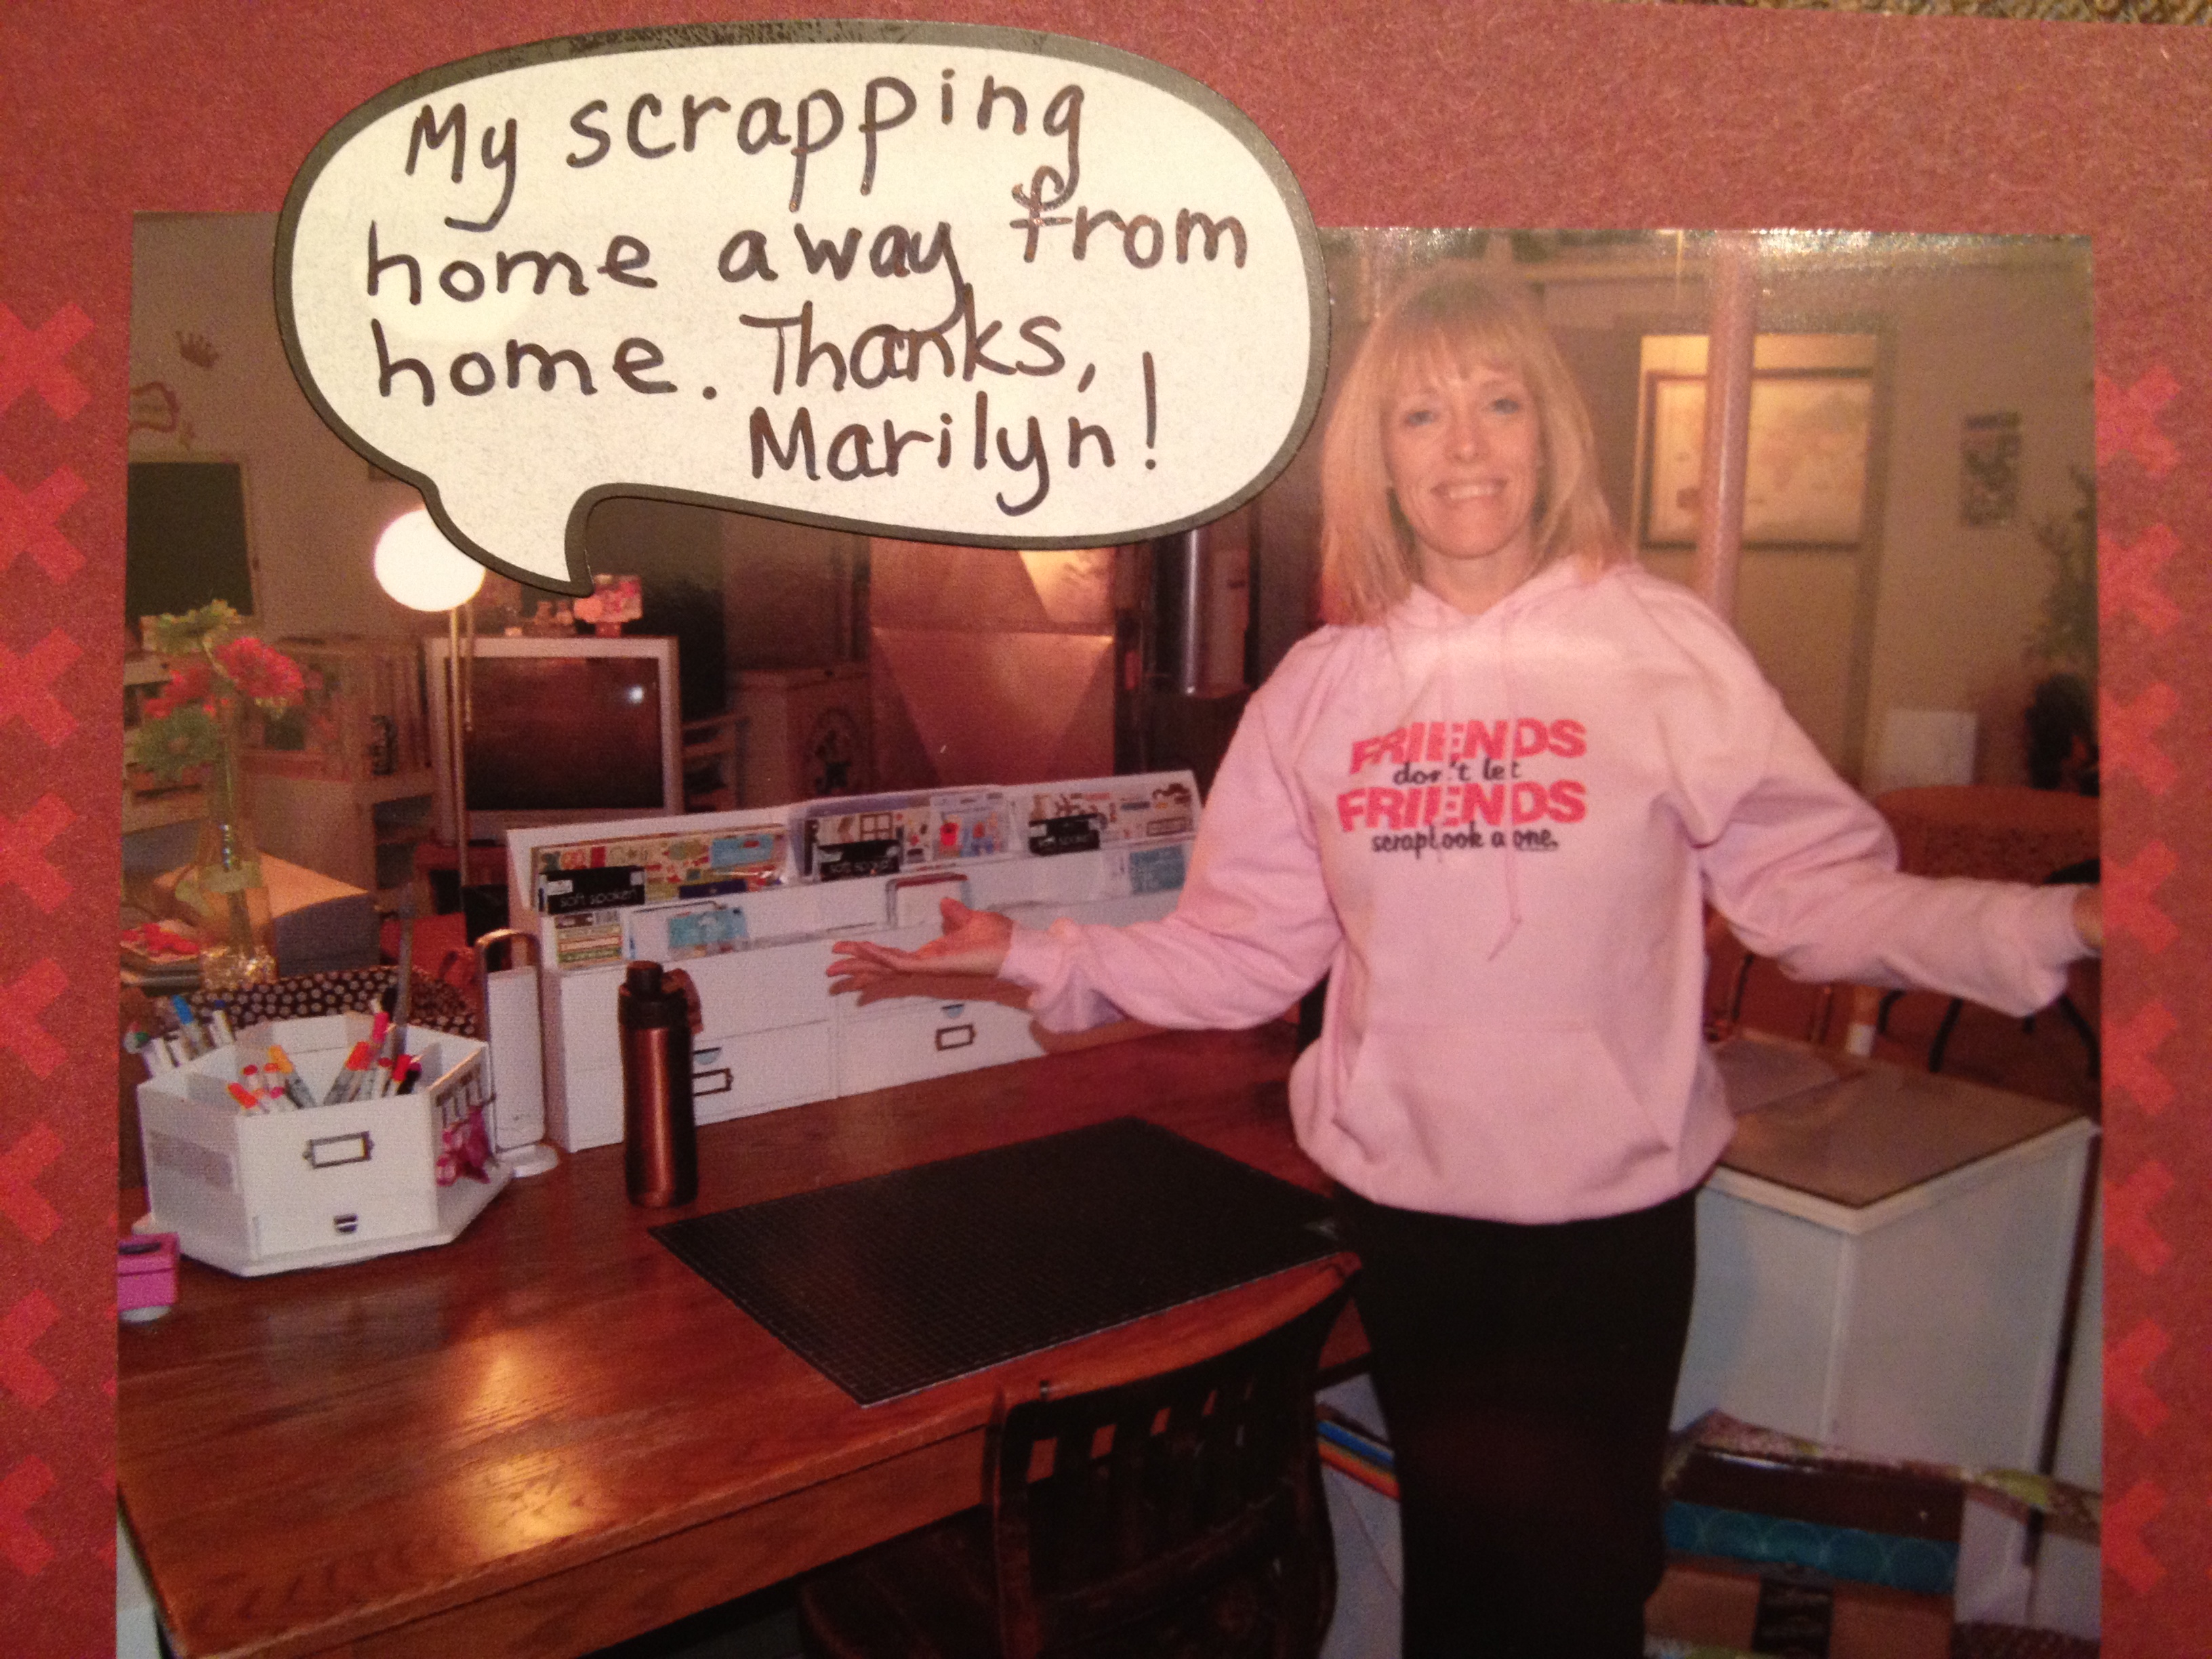
It didn’t take me too many children to determine that keeping a scrapbook of every good photo for every child wasn’t feasible. I started making digital photo books and found it was a huge timesaver (I love Creative Memories’ software and Shutterfly). But my friend, Marilyn, convinced me that paper scrapbooking could be quick, too.
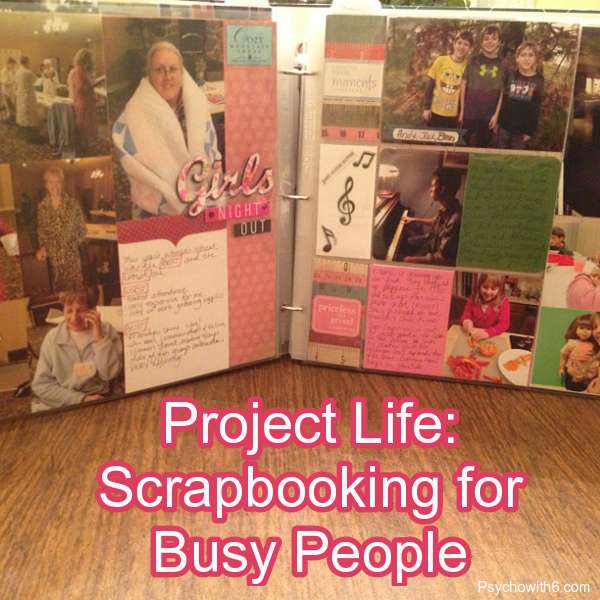
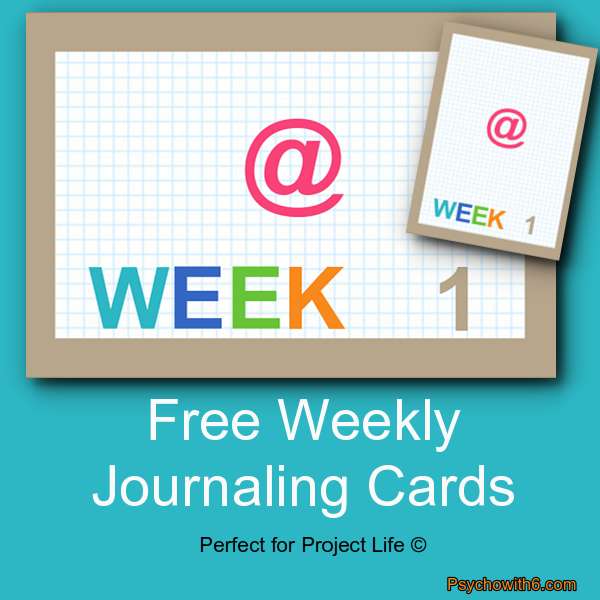
What’s Project Life?
Becky Higgins created an approach to scrapbooking that eliminates the need for lots of supplies, decisions, and time. Using photo pages with sleeves sized for 4×6 and 3×4 photos, Project Life scrapbookers can slide pictures, journaling cards, and embellishments into place in a jiffy.
But Project Life isn’t just about saving time; it’s about saving the memories that matter. Before I started Project Life, I only thought about memorializing the holidays, trips, and big activities. I never thought about capturing the ordinary, everyday stuff and people that make my life meaningful. My Project Life album now has a screenshot of my blog, a photo of the hairdresser I’ve seen for 15 years, and a mini poster of a movie we saw.
Project Life can be done digitally, but I’m so glad I’m using paper. Sitting in front of a computer isn’t the same as scrapbooking with a friend. My friend and I spend time together once a week on our albums. My nine-year-old daughter also joins us for some girly time (which she desperately needs in a houseful of boys!). She is doing her own version of Project Life in an 8×8 album, but it’s even more precious than mine. She will look back on her memories and be so glad she has them preserved! In a few hours a week, I enjoy quality time with a girlfriend and my daughter and capture the moments that mean the most. My husband absolutely loves the results!
What You Need to Get Started
Becky Higgins’s website offers kits, but you can find what you need at craft and other stores. An album. I recommend a 12×12 large ring style. Photo pocket pages. You will need a few 12×12 pages if you’d like to include calendar pages, but the rest will be various configurations of sizes.
A photo printer. I really see this as a must. Even having to order photos and run up to my corner Walgreens was too much of a bother for me before I started Project Life. I use an Epson PictureMate Charm Photo Printer. I can quickly print 4×6 or 3×4 photos for my album as I scrapbook. You can print directly from your photo card, but I print from my laptop. My daughter and I pick out the photos we want to use after viewing them in a larger size. Journaling cards and other inserts. As this style of scrapbooking becomes more popular, you will find many kinds of these cards, from those that are purely decorative to those that guide your journaling.
Something to organize your supplies. If you’re a scrapbooker with stickers and other embellishments, you can use them with Project Life. You can also add memorabilia! No longer does everything have to be matchy-matchy. Somehow the format makes everything look great. Marilyn found these white organizers at Michaels and they are perfect for keeping all of our supplies organized and within reach. We each have three of them. The matching friends-don’t-let-friends-scrapbook-alone sweatshirts are optional!
How About Some Free Weekly Cards?
Most Project Life scrapbookers use cards that indicate which week of the year they are documenting. We’ve made our own with letter stickers, but you run out of W’s, E’s, and K’s pretty quickly! As it’s something we need every week, we’re pretty surprised that you can’t buy them. I found one set for sale online using a woman’s landscape photos as backgrounds and cutting files for cards, but not exactly what I wanted. So I made them!
You can use them as is, journal on them, use markers to change the letter colors, or add stickers to completely change the look of them. Marilyn customized hers to the max! You can use the cards some weeks and not others. Perfectionism is NOT allowed.
I have 52 weeks of 4×6 and 3×4 weekly cards for you to print on white acid-free cardstock for nada! Just subscribe to this scrapbooking newsletter below. You’ll receive the cards and occasional updates on scrapbooking only. Please share this page with your scrapbooking pals.
***Update for 2015***
I kept having trouble remembering what week it was, so I added the dates to a new set of cards for this year. I kept the number on the left so these can be cut and used as a 3 x 4 or left as is for a 4 x 6 card. To download the full PDF file, subscribe below. You can also subscribe at this link. Once you have confirmed your subscription, you will receive a welcome email with the link to all the journaling cards and other Psychowith6 freebies. If you do not receive it, check your spam folder. Sometimes it takes a while for the email to arrive. Happy scrapping!
I recommend printing on white acid-free cardstock. Hope you enjoy them!
What do you think? Would a Project Life style scrapbook work for you?
I was expecting my fourth child as a mother of three sons. At the time, I had a number of online friends who also had boys and only boys. One of them shared that she had prayed about the gender of the child she was expecting and her son then had a dream that she would have a girl. The ultrasound revealed that he was right. I decided to pray about my child’s gender, too. I knew I would be happy either way, but this time (for what I thought was for sure my last child), I wanted to know.
I prayed and opened my daily Bible to the date my ultrasound was scheduled. The passage for that day read:
Genesis 35:17 And as she was having great difficulty in childbirth, the midwife said to her, “Don’t despair, for you have another son.”
Now, I was pretty sure there wasn’t a passage in Scripture that said, “Guess what? You’re having a daughter!” But I was still so struck by the direct answer to my prayer that I believed come ultrasound day, I would learn that boy number four was joining our family.
The ultrasound technician confirmed what God had already told me through His Word.
That evening, I had arranged to go out for dinner with my Bible study friends to give them the news. They were dying to know and not long after we were seated, a family with four boys sat behind us. I just gestured to them and said that my family would look just like that. After my friends were sure that I wasn’t upset about not having a daughter, they began deciding what I should name our son.
I had given my three sons biblical names, so that made the decision easier for them. Names were written on a paper napkin and then the debate started. Finally, after much discussion, they told me his name ought to be Benjamin. As I considered this name, I thought about the Scripture God had given me predicting another son. When I got home, I read further in Genesis:
18 As she breathed her last—for she was dying—she named her son Ben-Oni. But his father named him Benjamin.
Of course, I hoped I wasn’t going to die in childbirth! But I knew that my son’s name would be Benjamin and that God had known him even before he was conceived.
“Before I formed you in the womb I knew you, before you were born I set you apart; I appointed you as a prophet to the nations.” (Jeremiah 1:5)
I’m a Christian psychologist turned homeschooling mother of six. My life can be a little crazy, so I look for sanity-saving ideas to use and share. I hope you’ll read my About page to learn more.